How to convert your existing Android & iOS apps to Flutter?
Ever since its release on December 4, 2018, Flutter has come a long way to become developers’ favourite UI toolkit for creating natively compiled applications. The best thing about it is that it serves as a single source for desktop, mobile, and web applications.
Also, you can add Flutter to your existing iOS and Android applications. Read on to find out more about it.
Transitioning your existing Android and iOS applications into Flutter
If you have both Android and iOS applications, you might want to turn it into Flutter for many reasons. The prominent one among them would be to cut down both the costs and resources related to the development of applications.
Flutter is a cross-platform development tool. As such, it is compatible with both Android and iOS applications.
What’s more, What’s more, it also allows you to operate with a small team. Thus, you can save money on hiring professionals.
Using the native language for the development of applications has been a common practice among developers for a long time. But at present, app development companies are migrating toward other alternatives due to the elevated level of competition.
These days, companies are more concerned about developing applications with efficient resources. And Flutter is the best choice in this regard. It leaves the traditional approach far behind by an efficiency of 10%. Besides, it also cuts down the operational costs by a margin of 55%.
Despite the similarities in speed and performance between Flutter and the traditional options, there is one visible difference. The former has a true cross-platform nature.
Must read: How Technology has developed in Mobile apps and Online Services ?
Thus, you don’t need to work on codes all over again for various platforms. After working it out once, you can use it for different applications. Plus, its compatibility with most modern frameworks means you would be good to go by testing the app only for once.
When you add up both these advantages, it leads to savings in time, effort, and money.
Read on to find out how you can integrate the Flutter module with Android/iOS applications.
Integration of the Flutter module
There are two ways to integrate the Flutter module with iOS/Android applications.
The first one includes using the Flutter create command for the creation of a fresh Flutter app and then substituting the resulting project with the existing one. Another way to do it is to create a new Flutter app with the t module. You can choose any out of the two options, depending on your convenience.
The first way to accomplish the task is more commonplace than the second one. But it necessitates technical expertise on the part of the developer. Plus, they also need to be careful about how they work on the project from the beginning until the end.
The number of tweaks it involves is mind-boggling. A developer needs to get everything right. Even a single mistake in it can render the whole structure dysfunctional. Whereas, the second one involves a separate Flutter module that a developer can distinguish from the main code.
Following your decision to choose which way you would want to go, you can proceed with the next step. The subsequent step is all about establishing the communication between the Flutter module and the native code.
How to develop a new feature
One of the obvious examples of adding a new feature to a project is the one linked to surveying from a profile screen of an application. For the sake of understanding, consider the following screen:
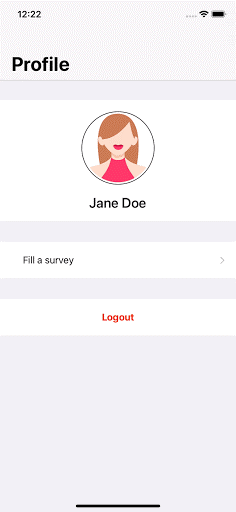
If it is for iOS, the coding for concluding the survey action would go as follows:
func makeAction(at index: Int) {
guard
let delegate = UIApplication.shared.delegate as? AppDelegate,
let engine = delegate.flutterEngine,
let controller = FlutterViewController(engine: engine, nibName: nil, bundle: nil)
else { return }
present(controller, animated: true)
}
As the module does not know much about the Flutter screen, there is no scope of closing the latter. You need to bridge the gap between the Flutter module and the native code. One of the best ways to do it is to create a channel for communication between both.
How to build channels for communication
You can use Platform Channels for this purpose. Again, there are two popular choices in this regard: the Method Channel and Message Method. The former helps in passing data between native and Flutter codes, whereas the latter involves calling functions.
The major obstacle in establishing channels for communication between the platform channels between the two modules is the lack of binary compatibility. Sterilizing data into a JSON string can help overcome this challenge and ensure better compatibility between the frameworks.
After transmitting the data from native to the Flutter mode, the next thing you need to ensure is to send results. For the latter, you can use an API layer.
How to open a channel
Incorporating the feature to close a survey is one of the core objectives of creating a channel. But to accomplish this task, you need to create method channels.
First, focus your attention on the Flutter module. Prior to presenting a controller with it, you need to insert the subsequent lines for the iOS platform.
Here’s an illustration for its coding for your reference.
let channel = FlutterMethodChannel(name: “survey_channel”, binaryMessenger: controller)
channel.invokeMethod(“prepare”, arguments: user.fullName)
channel.setMethodCallHandler { [weak self] call, result in
switch call.method {
case “close”:
self?.dismiss(animated: true, completion: nil)
result(nil)
default:
result(FlutterMethodNotImplemented)
}
}
The aforementioned example involves a new channel with the “FlutterViewController” object. The latter is in the form of a ‘binaryMessenger”. You can replace it with any other channel name depending on the needs of your project. However, you will need to use the same channel name on all sides.
You need to open a channel. Next, you need to furnish the full name of a user to the Flutter-module. You can use the prepare method for this purpose. Thereafter, you need to establish a handler for the Flutter-module.
Now use the following coding with the Flutter module:
class _SurveyPageState extends State<SurveyPage> {
bool showCloseAction = false;
String fullname = ”;
static const apiChannel = const MethodChannel(‘survey_channel’);
@override
void initState() {
apiChannel.setMethodCallHandler(_handleMethod);
super.initState();
}
void close() {
apiChannel.invokeMethod(‘close’);
}
Future<dynamic> handleMethod(MethodCall call) async {
switch(call.method) {
case ‘prepare’:
setState(() {
fullname = (call.arguments as String) ?? ”;
showCloseAction = true;
});
return Future.value();
}
}
@override
Widget build(BuildContext context) {
return Scaffold(
appBar: AppBar(
title: Text(widget.title),
leading: showCloseAction ? IconButton(icon: Icon(Icons.close), onPressed: close,) : null,
),
body: … // this part is not changed yet
);
}
}
How to make a survey list
Creating a survey list is a simple and straightforward process. All you need to do is play with and toss a few widgets.
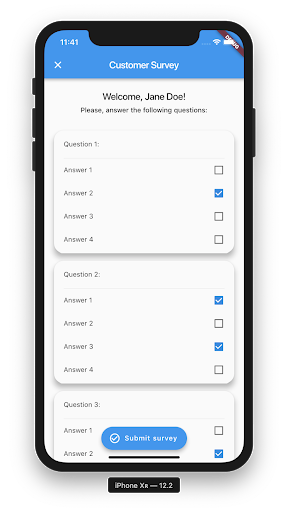
Consider the image below:
You can either use Dart or a native call to furnish the accumulated answers. The example below uses the latter option with serialized data corresponding to Map<int, List<int>>.
Given below is a coding example to add a handler to the iOS side.
case “sendSurvey”:
guard let survey = call.arguments as? [Int: [Int]] else { return result(false) }
print(“sending survey: \(survey)”)
DispatchQueue.main.asyncAfter(deadline: .now() + 0.5) {
result(true)
}
This coding is for demo purposes. So, the job can be concluded by providing a caller with the answers following a brief waiting-period involving a few seconds to a minute. In case of a real app, you need to opt for an API call at the initial stage. Thereafter, you can opt for an asynchronous callback.
The following coding example explains how you can add a handler to the submit button on the side of Flutter.
_submitAnswers(BuildContext context) async {
setState(() => isLoading = true);
final bool success = await apiChannel.invokeMethod(‘sendSurvey’, survey);
if (success) {
Navigator.of(context).push(MaterialPageRoute(builder: (_) => RewardPage(apiChannel: apiChannel,)));
} else {
showDialog(…);
}
setState(() => isLoading = false);
}
The “isLoading” variable in the aforementioned example displays the activity indicator. Following it, the next step uses a platform channel to define a method. When the result comes out in the final stage, you need to check an invocation result. The rationale behind this step is to either display an error alert or the reward page.
Here’s how the resulting profile screen looks like:
Conclusion
The process to convert an existing Android & iOS app to Flutter is simple if you know how to go about it. The aforementioned example involves a simple demo coding. One can further expand it to match the production code of a Flutter app development company.
Author Bio:
 James Grills is a marketing advisor – currently associated with Cumulations Technologies, a Android App Development company. He is a technical writer with a passion for writing on emerging technologies in the areas of mobile application development and IoT technology.

