Asp.Net Core is one of the leading Microsoft web frameworks having some magnificent features that help developers to build websites much quicker and easier. With the fine support of Windows Forms Designer tool in Asp.Net Core, it has become much stronger and helps you in building solid UIs with a rich look.
Many times, developers need to store the file on the server, and storing the physical file on the server is difficult because the server requires a lot of physical space. Thus let’s learn how to upload and download the file directly from the database in asp.net core.
Let’s Start With Example
Step 1: Create an application.
Open Visual Studio 2019.
Go to File manager ->project.
Create a new Asp.net Core Web Application project with the “DemoTest” name and click on the Create button.
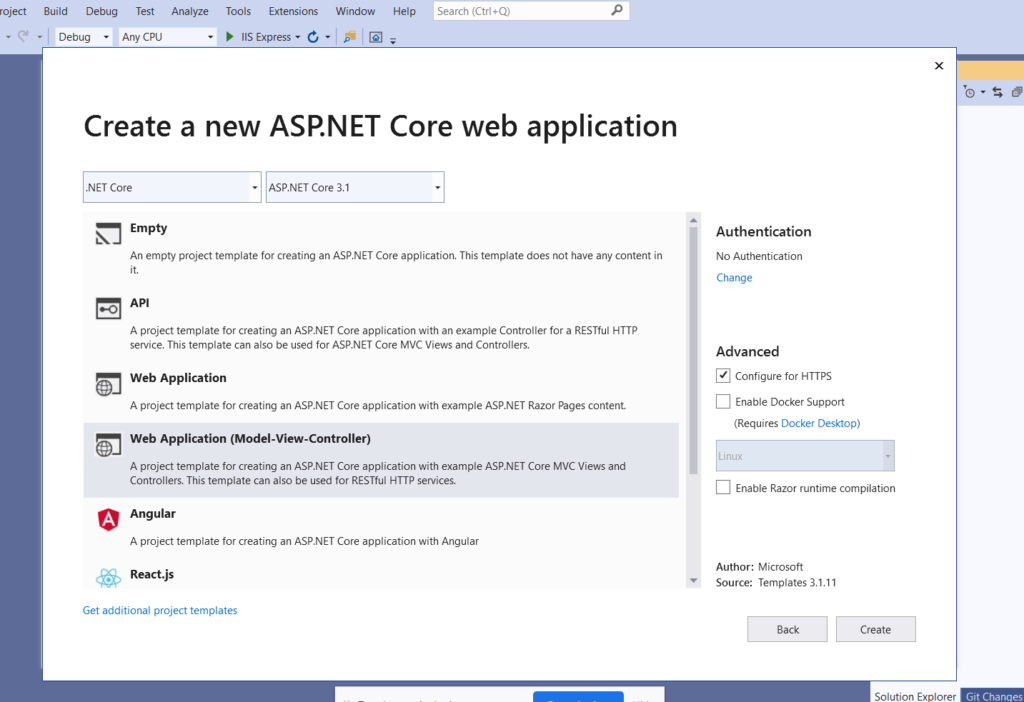
Step 2: Select Template.
Select the web application (Model-View-Controller) template and click on the Create button.

Step 3: Set up the database
Open Server Explorer
Add Connection to the existing database.
Add “student” and “File” tables as follow.
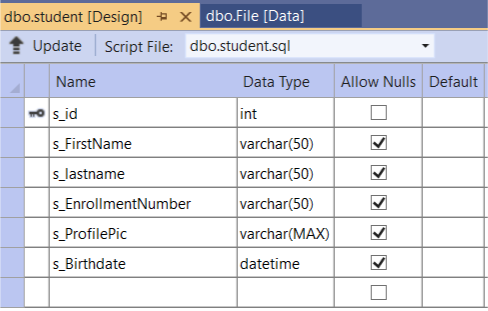
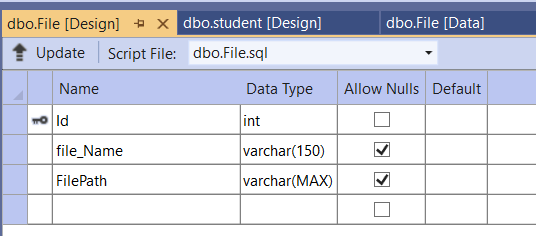
Step 4: Create a Model
Right click on Model Folder->Click on Add option->Add class.
Add StudentModel and FileModel as follow:
StudentModel.cs
using System;
using System.ComponentModel.DataAnnotations;
namespace DemoTest.Models
{
public class StudentModel
{
[Key]
[Display(Name = “Student Unique-Id”)]
public int s_id { get; set; }
[Display(Name =”FirstName”)]
public string s_FirstName { get; set; }
[Display(Name = “LastName”)]
public string s_lastname { get; set; }
[Display(Name = “Enrollment Number”)]
public string s_EnrollmentNumber { get; set; }
[Display(Name = “Photo”)]
public string s_ProfilePic { get; set; }
[Display(Name = “Birthdate”)]
[DataType(DataType.Date)]
public DateTime s_Birthdate { get; set; }
}
}
FileModel.cs
using System.ComponentModel.DataAnnotations;
namespace DemoTest.Models
{
public class FileModel
{
[Key]
[Display(Name = “File Id”)]
public int Id { get; set; }
[Display(Name = “Name”)]
public string file_Name { get; set; }
[Display(Name = “File”)]
public string FilePath { get; set; }
}
}
Step 5: Add ApplicationDbContext class
Right-click on solution explorer->Go to NuGet Package Manager.
Install Microsoft.EntityFrameworkCore.SqlServer package.
Go to Model Folder->Add class with “ApplictionDbContext” name.
using Microsoft.EntityFrameworkCore;
namespace DemoTest.Models
{
public class ApplicationDbContext : DbContext
{
public ApplicationDbContext(DbContextOptions<ApplicationDbContext> options) : base(options)
{
}
public DbSet<StudentModel> student { get; set; }
public DbSet<FileModel> File { get; set; }
}
}
Step 6: Add Controller.
Go to Controller Folder->Add “StudentController” and “FileController”.
StudentController
using Microsoft.AspNetCore.Mvc;
using System.Linq;
using System.Threading.Tasks;
using Microsoft.AspNetCore.Http;
using Microsoft.AspNetCore.Hosting;
using DemoTest.Models;
using System.IO;
namespace DemoTest.Controllers
{
public class StudentController : Controller
{
private readonly ApplicationDbContext _dbContext;
private readonly IWebHostEnvironment _iWeb;
public StudentController(ApplicationDbContext dbContext, IWebHostEnvironment iWeb)
{
_dbContext = dbContext;
_iWeb = iWeb;
}
public IActionResult Index()
{
var student = _dbContext.student.ToList();
return View(student);
}
public IActionResult CreateStudent()
{
return View();
}
[HttpPost]
public async Task<IActionResult> CreateStudent(IFormFile s_ProfilePic, StudentModel s)
{
var imgEx = Path.GetExtension(s_ProfilePic.FileName);
if (imgEx == “.jpg” || imgEx == “.png”)
{
var uploadingPath = Path.Combine(_iWeb.WebRootPath, “Images”, s_ProfilePic.FileName);
var fileStream = new FileStream(uploadingPath, FileMode.Create);
await s_ProfilePic.CopyToAsync(fileStream);
fileStream.Close();
s.s_ProfilePic = s_ProfilePic.FileName;
}
await _dbContext.student.AddAsync(s);
await _dbContext.SaveChangesAsync();
return RedirectToAction(“Index”);
}
public IActionResult EditStudent(int id)
{
var studentDetail = _dbContext.student.Find(id);
return View(studentDetail);
}
[HttpPost]
public async Task<IActionResult> EditStudent(IFormFile s_ProfilePic, StudentModel s)
{
if(s_ProfilePic!=null)
{
var studentDetail = _dbContext.student.Find(s.s_id);
s.s_ProfilePic = studentDetail.s_ProfilePic;
var imgEx = Path.GetExtension(s_ProfilePic.FileName);
if (imgEx == “.jpg” || imgEx == “.png”)
{
var uploadingPath = Path.Combine(_iWeb.WebRootPath, “Images”, s_ProfilePic.FileName);
var fileStream = new FileStream(uploadingPath, FileMode.Create);
await s_ProfilePic.CopyToAsync(fileStream);
fileStream.Close();
s.s_ProfilePic = s_ProfilePic.FileName;
}
}
_dbContext.Update(s);
await _dbContext.SaveChangesAsync();
return RedirectToAction(“Index”);
}
public async Task<IActionResult> DetailStudent(int id)
{
var studentDetail = await _dbContext.student.FindAsync(id);
return View(studentDetail);
}
public async Task<IActionResult> DeleteStudent(int id)
{
var studentDetail = await _dbContext.student.FindAsync(id);
return View(studentDetail);
}
[HttpPost]
public async Task<IActionResult> DeleteStudent(int id,string fname)
{
var studentDetail = await _dbContext.student.FindAsync(id);
fname = Path.Combine(_iWeb.WebRootPath, “Images”, studentDetail.s_ProfilePic);
FileInfo fi = new FileInfo(fname);
if(fi.Exists)
{
System.IO.File.Delete(fname);
fi.Delete();
}
_dbContext.student.Remove(studentDetail);
await _dbContext.SaveChangesAsync();
return RedirectToAction(“Index”);
}
}
}
Note: For image .jpg and .png extension are required.
Create Image Folder inside www root folder.
In StudentController CreateStudent() method add student detail ,EditStudent() method edit Student detail, DetailStudent() method display detail of single student and DeleteStudent() method delete Student detail.
FileController
using Microsoft.AspNetCore.Mvc;
using System.Collections.Generic;
using System.Linq;
using System.Threading.Tasks;
using Microsoft.AspNetCore.Http;
using Microsoft.AspNetCore.Hosting;
using DemoTest.Models;
using System.IO;
namespace DemoTest.Controllers
{
public class FileController : Controller
{
private readonly ApplicationDbContext _dbContext;
private readonly IWebHostEnvironment _iWeb;
public FileController(ApplicationDbContext dbContext, IWebHostEnvironment iWeb)
{
_dbContext = dbContext;
_iWeb = iWeb;
}
public IActionResult Index()
{
var file = _dbContext.File.ToList();
return View(file);
}
public IActionResult Upload()
{
return View();
}
[HttpPost]
public async Task<IActionResult> Upload(IFormFile file_Name,FileModel file)
{
if (file_Name != null || file_Name.Length != 0)
{
var path = Path.Combine(Directory.GetCurrentDirectory(), “wwwroot”, file_Name.FileName);
file.FilePath = path;
file.file_Name = file_Name.FileName;
using (var stream = new FileStream(path, FileMode.Create))
{
await file_Name.CopyToAsync(stream);
}
}
_dbContext.File.Add(file);
await _dbContext.SaveChangesAsync();
return RedirectToAction(“Index”);
}
public async Task<IActionResult> DownloadFile(string Name)
{
var path = Path.Combine(Directory.GetCurrentDirectory(),”wwwroot”,Name);
var memory = new MemoryStream();
using (var stream = new FileStream(path, FileMode.Open))
{
await stream.CopyToAsync(memory);
}
memory.Position = 0;
return File(memory, GetContentType(path), Path.GetFileName(path));
}
private string GetContentType(string path)
{
var types = GetMimeTypes();
var ext = Path.GetExtension(path).ToLowerInvariant();
return types[ext];
}
private Dictionary<string, string> GetMimeTypes()
{
return new Dictionary<string, string>
{
{“.txt”, “text/plain”},
{“.pdf”, “application/pdf”},
{“.doc”, “application/vnd.ms-word”},
{“.docx”, “application/vnd.ms-word”},
{“.xls”, “application/vnd.ms-excel”},
{“.xlsx”, “application/vnd.openxmlformatsofficedocument.spreadsheetml.sheet”},
{“.png”, “image/png”},
{“.jpg”, “image/jpeg”},
{“.jpeg”, “image/jpeg”},
{“.gif”, “image/gif”},
{“.csv”, “text/csv”}
};
}
}
}
In File Controller, the Upload method is used to upload files, and the Download method is used to download the file.
Step 7: Add View
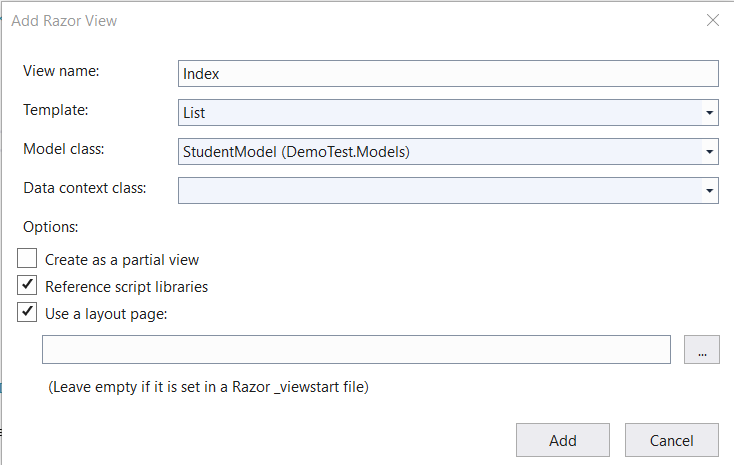
Right-click on View->Add view
Select Template based on the method.
Continue this process for each method of StudentController and FileContoller.
Note: For uploading File or image method=”post” enctype=”multipart/form-data” must require in <form> tag in view page.
View of Upload () Method: Upload.cs
@model DemoTest.Models.FileModel
@{
ViewData[“Title”] = “Upload”;
}
<h1>Upload</h1>
<h4>FileModel</h4>
<hr />
<div class=”row”>
<div class=”col-md-4″>
<form asp-action=”Upload” method=”post” enctype=”multipart/form-data”>
<div asp-validation-summary=”ModelOnly” class=”text-danger”></div>
<div class=”form-group”>
<label asp-for=”file_Name” class=”control-label”></label>
<input asp-for=”file_Name” class=”form-control” type=”file”/>
<span asp-validation-for=”file_Name” class=”text-danger”></span>
</div>
<div class=”form-group”>
<input type=”submit” value=”Upload” class=”btn btn-primary” />
</div>
</form>
</div>
</div>
<div>
<a asp-action=”Index”>Back to List</a>
</div>
@section Scripts {
@{await Html.RenderPartialAsync(“_ValidationScriptsPartial”);}
}
Step 6: Configure Startup. cs file
Add Following libraries to Startup.class
using Microsoft.EntityFrameworkCore;
using DemoTest.Models;
using Microsoft.Extensions.FileProviders;
using System.IO;
Add DbContext in ConfigureServices method
public void ConfigureServices(IServiceCollection services)
{
services.AddControllersWithViews();
services.AddDbContext<ApplicationDbContext>(options =>
options.UseSqlServer(Configuration.GetConnectionString(“DatabaseConnection”)));
services.AddSingleton<IFileProvider>(
new PhysicalFileProvider(Path.Combine(Directory.GetCurrentDirectory(), “wwwroot”)));
}
Set Index method of StudentContoller as starting point of application in Configure () method.
app.UseEndpoints(endpoints =>
{
endpoints.MapControllerRoute(
name: “default”,
pattern: “{controller=Student}/{action=Index}/{id?}”);
});
Step 8: Build and Run project.
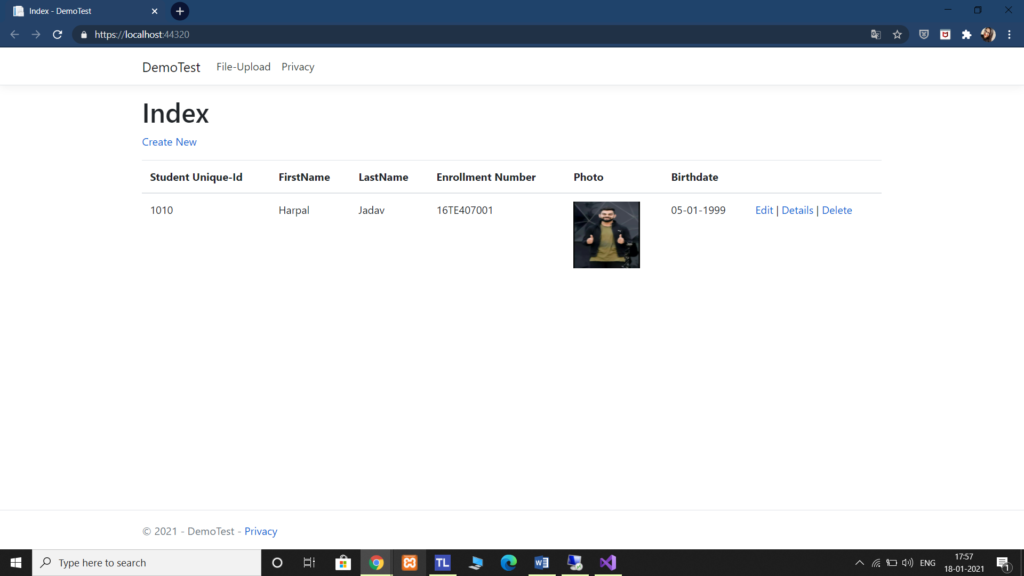
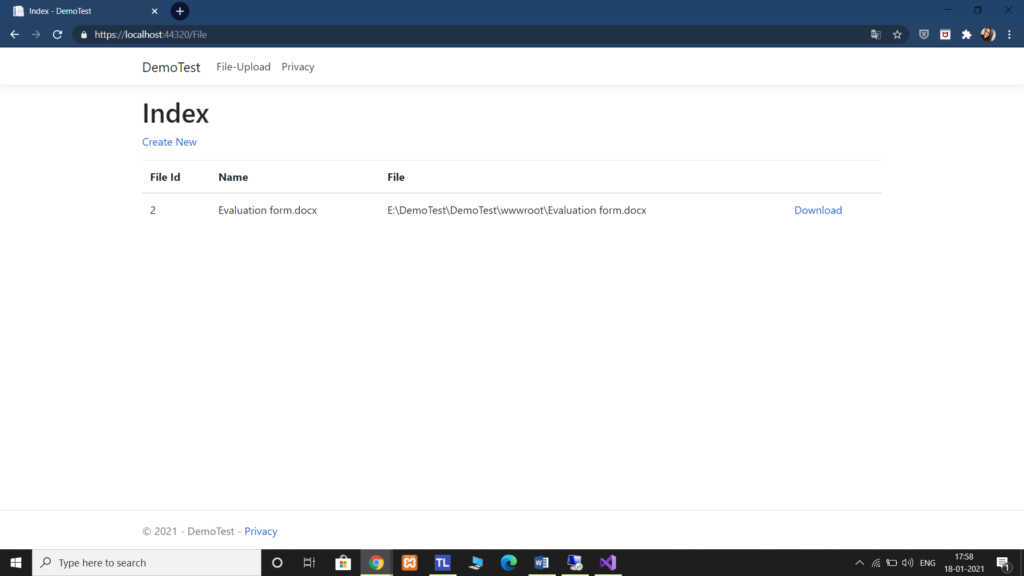
Conclusion:
In this blog, we went through the topic of “how to perform crud operations like Insert, Update, Delete in Asp.Net Core”. Also discussed Upload and Download file and discuss an example of crud operation and upload/download in Asp.net Core application.
Author Bio: Ajay Patel – Technical Director, iFour Technolab Netherlands
 A Seasoned technocrat with years of experience building technical solutions for various industries using Microsoft technologies. With sharp understanding and technical acumen, have delivered hundreds of Web, Cloud, Desktop and Mobile solutions and is heading the technical department at ASP.NET Core Software Company – iFour Technolab Netherlands.
Image:


